When your overhead door quits on you, it's more than just an inconvenience—it can halt business operations or disrupt your entire day at home. But before you start picturing a massive repair bill, let me share a secret from years in the field: a significant percentage of issues have surprisingly simple fixes. This overhead door troubleshooting guide is designed to walk you through practical, actionable checks that can solve the problem in minutes, whether you're in Texas or Oklahoma.
Starting Your Overhead Door Diagnosis
Whether it’s at your Texas home or your Oklahoma business, a stuck overhead door brings operations to a screeching halt. While your first thought might jump to a major mechanical failure, industry data shows that's rarely the case. A high volume of service calls we receive are for issues that a property owner could have easily handled themselves with the right information. That’s why starting with a quick, methodical diagnostic is your best first move.
The idea is to eliminate the simple culprits first. It's just like detective work—you check the obvious clues before you start chasing down complex theories. This approach isn't just efficient; it's also the safest way to tackle the problem, ensuring you don't miss a five-second fix while searching for a five-hundred-dollar headache.
Before we dive in, here's a quick checklist you can run through to cover the most common culprits right away.
Initial Diagnostic Checklist
| Symptom | First Check | Potential Cause | Actionable Tip |
|---|---|---|---|
| Door won't move at all | Power to the opener | Unplugged motor or tripped breaker | Confirm the motor is plugged into a live outlet and check your breaker box. |
| Remote doesn't work | Remote control batteries | Dead or weak batteries | Try the wall-mounted control. If it works, replace remote batteries. |
| Door closes partway, then reverses | Safety sensor alignment | Blocked or misaligned sensors | Check for obstructions and ensure the LED lights on both sensors are solid. |
| Door is noisy during operation | Tracks and rollers | Debris or lack of lubrication | Visually inspect the tracks for dirt and listen for where the noise originates. |
Running through these basic points can often pinpoint the problem in under a few minutes, getting you back on track without needing to call in a pro.
The Power and Control Check
Alright, first things first: let's talk power. Is the opener motor actually plugged into a working outlet? It sounds almost too simple, but you’d be surprised how often a plug gets knocked loose. After that, walk over to your building's circuit breaker panel and make sure the breaker for the door hasn't tripped. A quick flip of the switch might be all it takes.
With power confirmed, turn your attention to the controls. If you're clicking your remote with no response, the problem is very often the batteries. In fact, field data shows that dead batteries account for a staggering 30-40% of all remote control malfunctions. Swap in a fresh set and try again. Also, be sure to test the wall-mounted button. If the wall panel operates the door but the remote won't, you've just isolated your problem.
Pro Tip: Got more than one remote for the same door? Test them all. If just one has stopped working, it's a dead giveaway that the issue is with that specific remote's battery or programming, not the opener's main receiver.
Inspecting Your Safety Sensors
If the door starts to close but then shoots right back up, the safety sensors are almost always the culprit. These "photo eyes" sit near the bottom of your door tracks and are non-negotiable safety features required by federal law under UL 325 standards. They shoot an invisible infrared beam across the opening, and if anything breaks that beam, the door immediately reverses.
While they're essential for safety, their sensitivity means they can get knocked out of alignment or blocked pretty easily. A little dust, a cobweb, or even direct sunlight hitting the lens can cause a fault. Keeping them clean and aligned can prevent an incredible 90% of related malfunctions. You can learn more about these common garage door opener issues and their simple fixes, but for now, just take a look. The tiny LED lights on both sensors should be glowing steadily—if one is blinking or off, they're not lined up. Often, a quick wipe with a soft cloth and a gentle nudge back into position is all you need to do.
Decoding Opener and Electrical Issues
When your wall controls and remotes seem fine but the door still won’t budge, it's time to look at the opener unit itself. This motor is the heart of your entire system, and electrical gremlins are behind a large number of service calls. Sometimes it’s as simple as a tripped breaker, but often the symptoms point to something deeper within the motor, logic board, or receiver.
A classic scenario we run into across Texas and Oklahoma is a door that just hums without moving. That sound is the motor trying to do its job. More often than not, the motor is fine—the real issue is a failed start capacitor. This small but vital part gives the motor the initial kick it needs to get going. Power surges from our frequent storms can easily knock them out, making capacitor replacement a standard repair.
Learning the Opener’s Language: Diagnostic Codes
Most openers made in the last decade have a built-in diagnostic system. When a fault occurs, an LED light on the motor unit will blink in a specific pattern. It’s not random—it’s a code telling you exactly what’s wrong.
Industry benchmarks show that homeowners who ignore or misread these diagnostic codes can spend up to 40% more time trying to figure out the problem. Taking a moment to learn what the flashes mean can save you a massive headache.
Before you start guessing, grab your owner's manual (or search for it online with your model number) and look up the code. For instance, five flashes on many models signals an overheated motor, while four flashes often points straight to those pesky safety sensors. This one step can stop you from thinking you need a new motor when all that’s required is a simple adjustment.
The infographic below highlights a key cause of motor strain: an imbalanced door.
Never underestimate this. An imbalanced door forces the motor to do the heavy lifting the springs are supposed to handle, which leads directly to overheating and premature electrical failure.
Common Opener Problems and What They’re Telling You
Let’s walk through a few real-world electrical issues that pop up constantly. Knowing what to look for will help you take the right next step.
- The door hits the floor, then immediately reverses. When the door touches down and bounces back up, the opener’s force or limit settings are usually off. The logic board is misinterpreting the floor as an obstruction. A quick recalibration, following the steps in your manual, often solves this in minutes.
- All your remotes and the keypad die at once. If the wall button still works but none of your wireless devices do, the problem is almost certainly the opener’s receiver logic board. These boards can burn out from age or power surges, effectively making the opener deaf to remote signals.
- The opener only works sometimes. This is an incredibly frustrating one, especially with the temperature swings we get. Intermittent operation is often caused by a failing logic board where tiny solder joints have developed hairline cracks, creating a connection that comes and goes.
Once you’re looking at a stripped drive gear or a faulty logic board, the repair gets significantly more involved. These jobs require dismantling the opener unit and handling delicate electronics. For these advanced problems, it's really best to call in professionals who handle overhead door opener repair every day. Going it alone can easily cause more damage.
Whether you're dealing with a home or business, persistent electrical issues are a clear sign it's time for a full system checkup from our garage door repair team. And if you're responsible for several doors, our resources offer some great tips for ongoing maintenance.
Solving Photo Eye Sensor Problems
If you've ever watched your overhead door start to close, only to shoot right back up for no apparent reason, your photo eye safety sensors are almost always the culprit. These small devices, mounted a few inches off the ground on either side of your door tracks, project an invisible infrared beam. It’s a critical safety feature—if anything breaks that beam, the opener immediately reverses, preventing it from closing on a person, pet, or object.
While this system is essential for safety, it can also be sensitive. Here in Texas and Oklahoma, a little dust, a stray leaf, or even the intense glare of direct sunlight can be enough to trick the sensors into thinking something is in the way.
Reading the Indicator Lights
The first thing you should do is take a look at the sensors themselves. Each one has a tiny LED light, and what that light is doing tells you everything.
- Both Lights are Solid: A steady, solid light on both sensors (usually one is green, the other is amber or red) means they see each other loud and clear. If the lights are solid but the door still reverses, the problem isn't the beam; you might need to look at the opener's force settings instead.
- One or Both Lights are Blinking/Off: This is the classic sign of a problem. A blinking or dead light means the infrared beam isn't making it across. The cause is either something blocking the way or the sensors have been knocked out of alignment.
This quick visual check is the single most important diagnostic you can do. It immediately points you in the right direction without having to guess.
Cleaning and Realigning Your Sensors
Once the lights tell you there’s a sensor issue, the fix is usually simple. In fact, industry reports show that 20–25% of all garage door service calls are just for dirty or misaligned photo eyes. Learning this quick fix can save you a service fee.
First, grab a soft, dry cloth and gently wipe the lens of each sensor. Clear away any dust, cobwebs, or grime. You'd be surprised how often this is all it takes to get that blinking light to turn solid again.
If cleaning doesn’t do the trick, they've likely been knocked out of alignment. It happens all the time—a trash can gets bumped into one, or a kid’s bike hits it.
- Find the blinking sensor and loosen the wingnut on its mounting bracket just enough to let you move it.
- Slowly and carefully adjust the sensor, aiming it directly across at the other one. You’ll have to pivot it slightly up and down, and left and right.
- Keep your eye on the LED light as you move it. The second it turns solid, you've found the sweet spot.
- Hold it steady and tighten the wingnut down firmly, making sure you don't accidentally move it again.
Expert Insight: Here’s a pro tip—use a small torpedo level. Place it on top of each sensor housing to make sure they're perfectly level and pointed straight. It takes all the guesswork out of the alignment process.
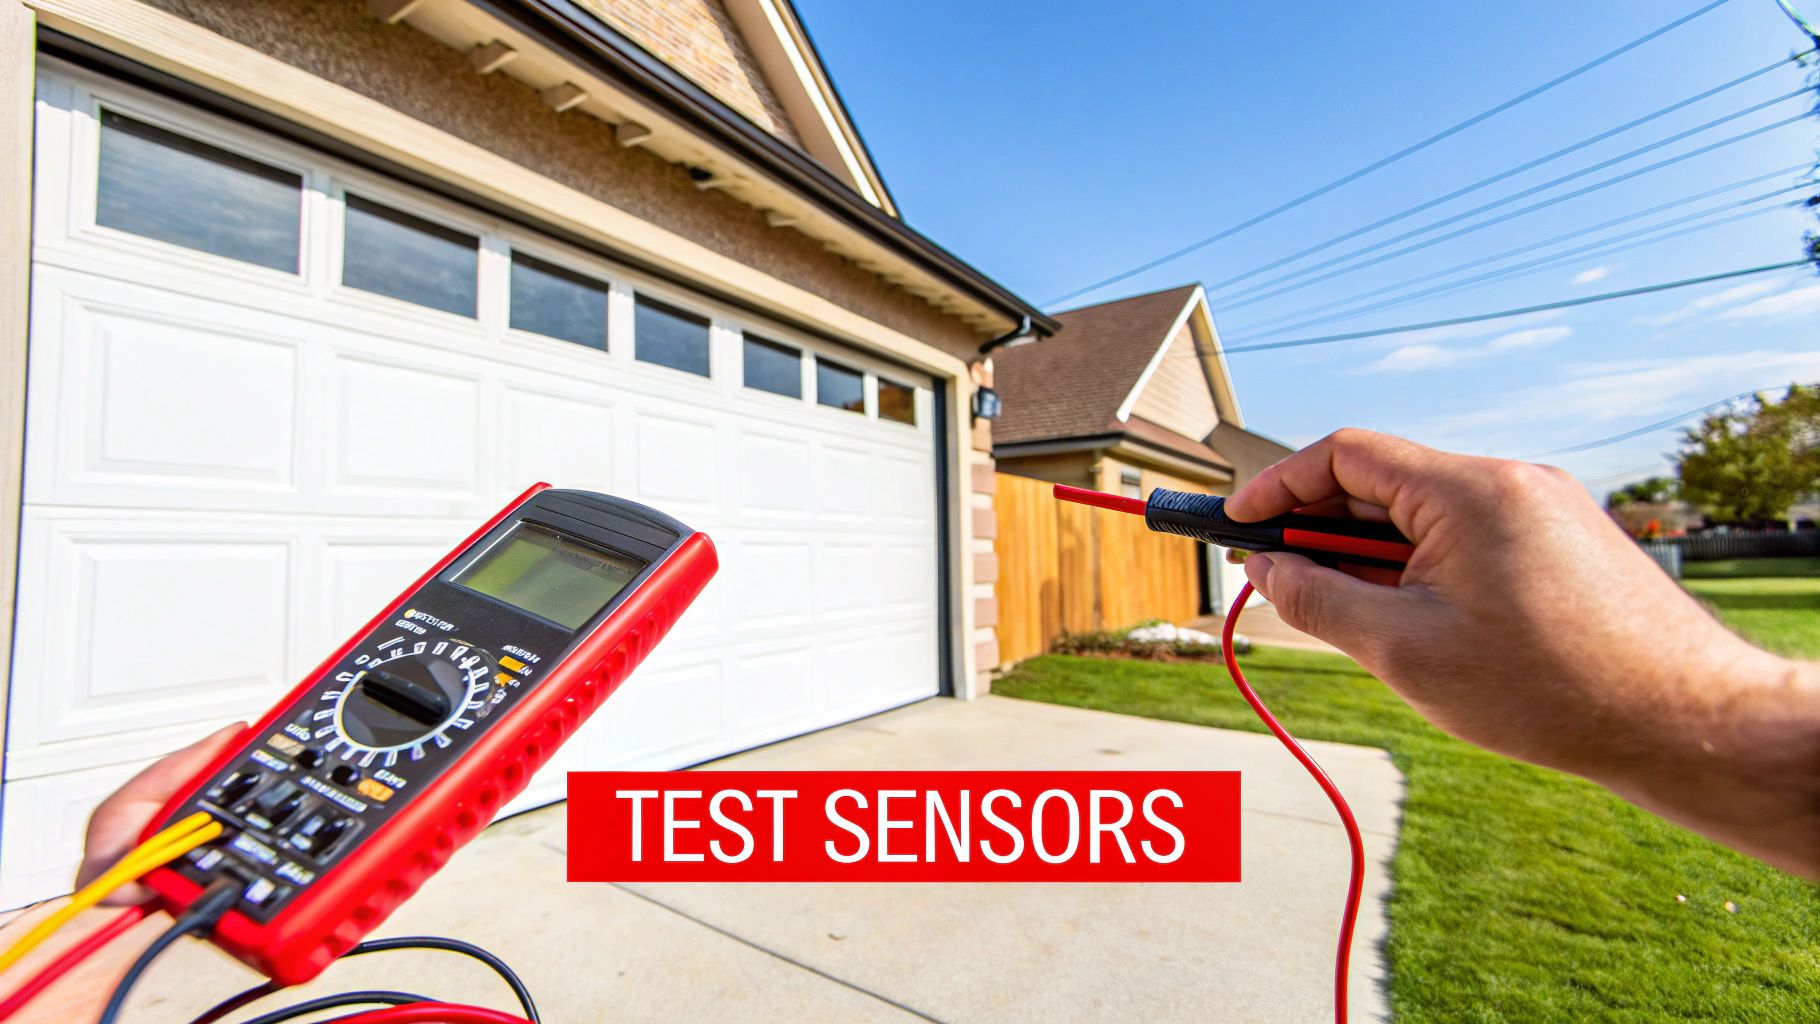
Checking for Wiring and Power Issues
What if you’ve cleaned and realigned them, and the light is still blinking? Now it's time to check the wiring.
Take a close look at the thin wires running from each sensor all the way back to the motor unit. You're looking for any obvious signs of damage—a staple that pierced the wire, a cut from a weed trimmer, or corrosion on the connections.
Also, check where the wires connect to the back of the opener itself. They can sometimes vibrate loose over time. Make sure they are pushed in securely. A poor connection here can cause those really frustrating, intermittent problems that are hard to pin down.
If you find a damaged wire or you're still stuck, it's probably time to call a professional. It could also just be that the sensors are old and have failed from moisture or age. If you need to replace them, it’s a good time to look at modern garage door accessories that might offer a more durable and reliable solution.
Spotting Mechanical Failures
Beyond the opener's electrical brain, it’s the mechanical hardware that does all the real work. When these parts start to give out, it's more than an inconvenience—it’s a major safety risk. Learning to spot the early warning signs of mechanical wear is one of the most important things you can do to keep your overhead door system safe and reliable.
You don't have to be a seasoned pro to notice when something is mechanically wrong. These issues almost always make themselves known through strange sounds or sights. A sudden, ear-splitting screech, a deep grinding noise, or a door that wobbles awkwardly in its tracks are all red flags. These are the problems that demand your immediate attention because a failing part can quickly lead to a complete and dangerous breakdown.
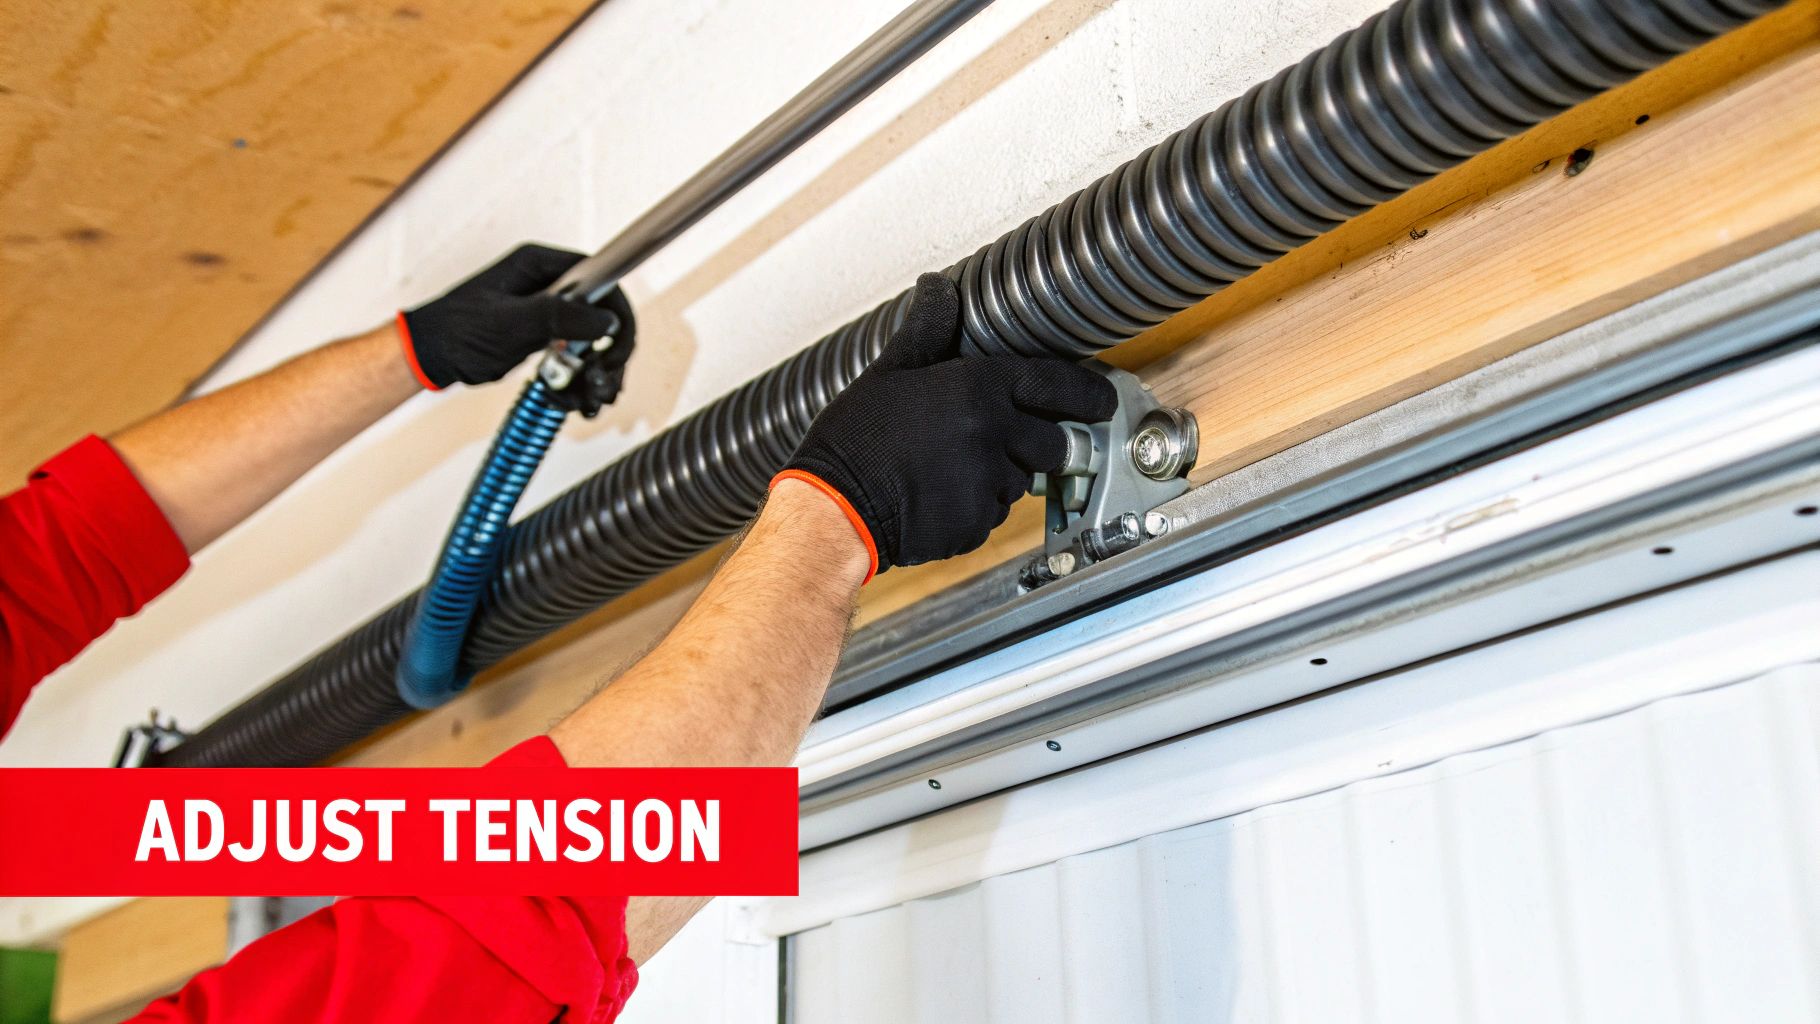
High-Tension Springs: The System’s Backbone
The most critical—and by far the most dangerous—mechanical parts are the torsion or extension springs. These massive springs are wound under incredible tension to perfectly offset the door's weight, which is what allows the opener to lift hundreds of pounds so easily.
When a spring finally gives out, it usually does so with a shockingly loud bang that can sound like a gunshot. That noise is the sound of an immense amount of stored energy being released in a split second. Springs are designed for a limited number of cycles, typically breaking after 10,000 to 15,000 uses. For most homes, that works out to a lifespan of about 7 to 12 years.
A broken spring isn't just a loud noise; it means the door can come crashing down without warning, creating a serious risk of injury or crushing whatever is underneath.
CRITICAL SAFETY WARNING: Never, under any circumstances, try to adjust, repair, or replace overhead door springs yourself. The energy they hold is powerful enough to cause severe injury or even death. This is a job that should only be handled by a trained professional with the right tools.
If you hear that loud bang or see a visible gap in the spring coil, disconnect the opener and call for professional service right away. Don’t try to operate the door.
Cables, Rollers, and Tracks: The Supporting Cast
While the springs are the most hazardous component, you can't ignore the other mechanical parts. A quick visual inspection every few months can help you catch problems before they spiral out of control.
Here’s a quick rundown of what to look for:
- Cables: Check the lifting cables on both sides of the door. Are there any signs of fraying, rust, or kinking? A cable that's starting to fail is a ticking time bomb that can cause the door to fall or hang crooked.
- Rollers: Worn-out or broken rollers are a common culprit behind a noisy, jerky door. Take a look at the rollers in the tracks. If they look cracked, chipped, or don't spin smoothly, they need to be replaced.
- Tracks: Scan the vertical and horizontal tracks for any dents, bends, or obstructions. Even a small bend in the track can cause the rollers to bind, putting a huge amount of strain on the opener and every other component.
For businesses and homes across Texas and Oklahoma, these simple checks are essential. On commercial properties, where doors are bigger and used far more often, this wear and tear happens much faster, and the consequences of a failure are far more serious.
How Residential and Commercial Parts Differ
It’s crucial to understand that commercial overhead door systems are built to an entirely different standard than what you'd find on a typical home. The mechanical parts are engineered to handle much greater weight, size, and daily usage.
I've put together a quick table to help you spot the tell-tale signs of mechanical wear and tear before they become a full-blown emergency.
Mechanical Wear and Tear Indicators
| Component | Audible Cue | Visual Sign | Recommended Action |
|---|---|---|---|
| Springs | Loud "bang" | A visible gap in the spring coil | Immediate professional replacement |
| Cables | Scraping or squealing | Fraying, rust, or broken strands | Professional replacement required |
| Rollers | Grinding or rattling noise | Cracked, chipped, or wobbly wheels | Replace worn rollers |
| Tracks | Screeching or binding | Dents, bends, or misalignment | Professional alignment or repair |
Paying attention to these signals allows you to address issues proactively. The bottom line is that using residential-grade parts on a commercial door is asking for trouble. They simply aren't built to withstand the constant demands of a warehouse or business, leading to frequent breakdowns and creating serious safety hazards.
When mechanical problems pop up, making sure the right components are used is non-negotiable. If you're dealing with persistent issues, our team specializing in comprehensive garage door repair can accurately diagnose the problem and install the correct commercial-grade parts to ensure your door operates safely and reliably for years to come.
Keep Your Door Running Smoothly with Preventative Maintenance
The best way to troubleshoot an overhead door is to prevent the problem in the first place. By implementing a proactive maintenance schedule, you can sidestep most sudden failures, expensive emergency calls, and dangerous situations. For property owners in Texas and Oklahoma, where dust, humidity, and extreme temperature swings stress mechanical systems, a simple maintenance plan is the best way to protect your investment.
Think of it like changing the oil in your car. You don't wait for the engine to seize; you perform maintenance to ensure it never does. A few minutes of care each season can add years to the life of your door system, keeping it quiet, safe, and reliable.
Your Seasonal Maintenance Checklist
You don't need to be a professional to handle the basics. Setting aside time every few months is all it takes to keep things in working order. A well-maintained door is noticeably quieter, safer, and far more dependable.
Here’s a simple schedule to follow:
- Quarterly (Every 3 Months): Lubricate all moving parts. A quick spray on the hinges, rollers, and springs prevents the grinding and friction that wears components down. While you're at it, give the rollers and cables a quick visual check for cracks or fraying. Catching these issues early is a game-changer.
- Biannually (Every 6 Months): The constant vibration from door operation can loosen hardware. Grab a wrench and check the nuts and bolts on the brackets and fasteners to make sure they’re snug. This is also the perfect time to run through the safety reversal tests, a non-negotiable check to ensure your door meets UL 325 safety standards.
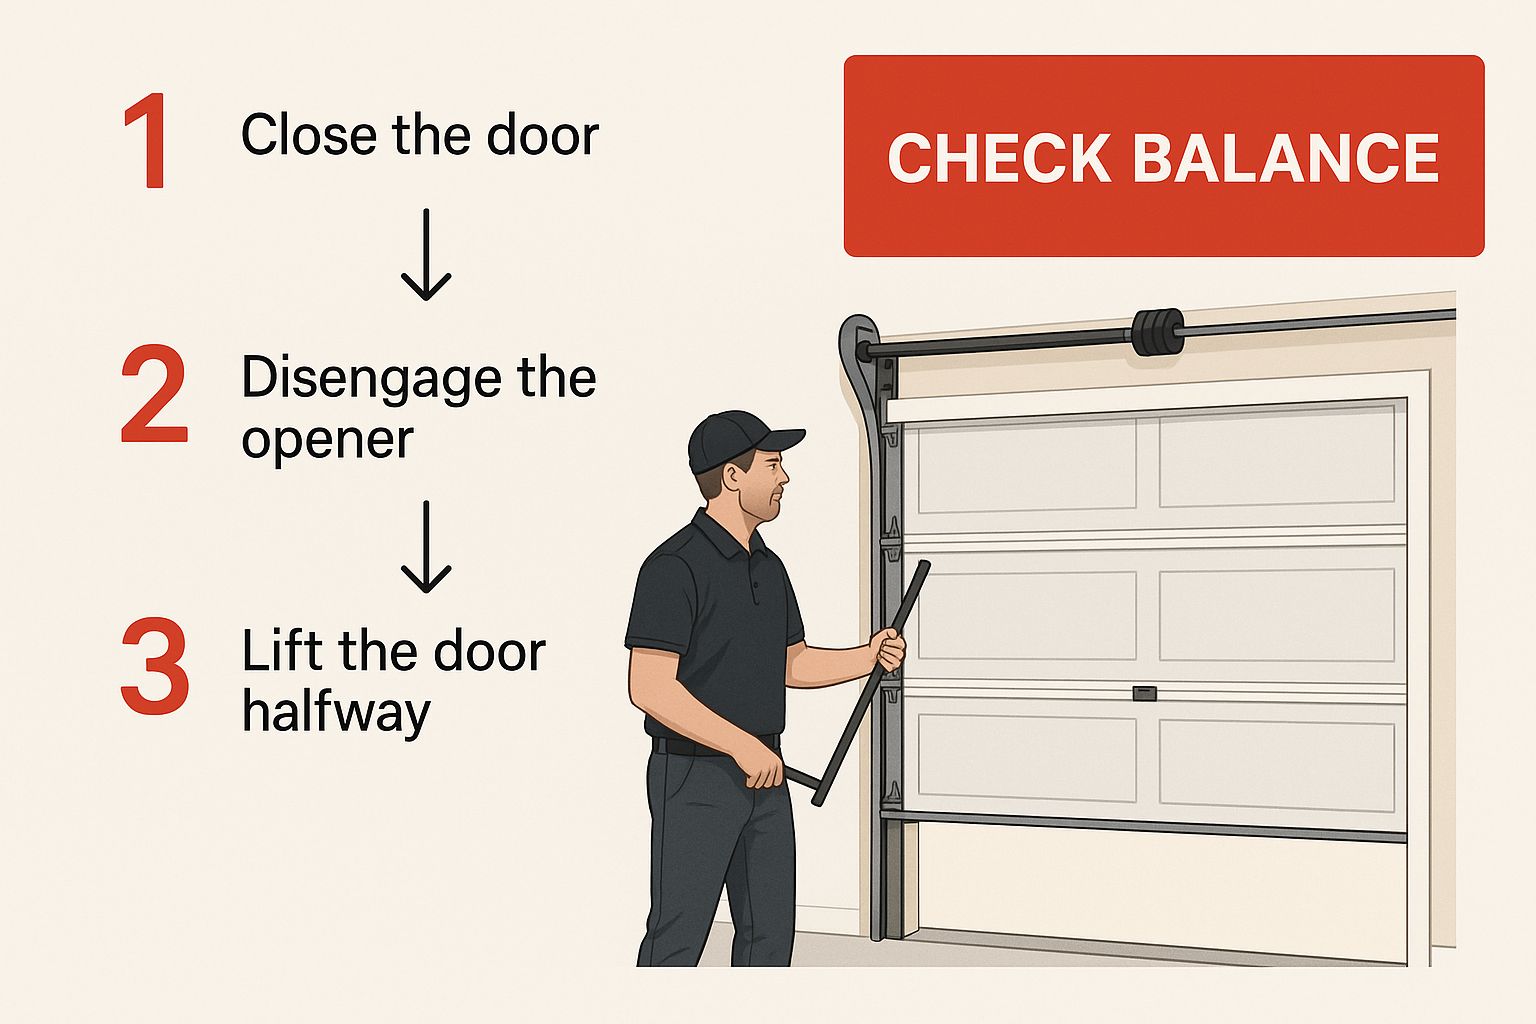
- Annually: At least once a year, you should check the door's balance, as an imbalanced door puts massive strain on the opener motor. It’s also a good idea to have a professional technician inspect the high-tension springs and perform a full system tune-up.
This routine is your best defense against unexpected breakdowns.
The Lowdown on Lubrication
If you only do one maintenance task, make it this one. Proper lubrication is the most effective thing you can do to quiet a noisy door, cut down on friction, and prevent premature wear on metal parts. But—and this is important—you must use the right product.
Never use heavy grease or a can of WD-40. Grease is a magnet for dirt and dust, which eventually turns into an abrasive paste that does more harm than good. And while WD-40 is great for many things, it's a solvent, not a long-term lubricant. Your best bet is a silicone or white lithium-based spray made specifically for garage doors.
A simple quarterly lubrication and biannual hardware check can extend your door's operational life and reduce the chance of an emergency repair by up to 50%. A well-maintained door also helps the opener motor last about 25% longer, saving you from a costly replacement. You can find more helpful tips on garage door maintenance on Overhead Door Parts Online.
When you're applying it, focus the spray on all the hinges, the stems of the rollers (avoid the nylon wheel itself), the springs, and along the opener's chain or screw drive.
Essential Safety Tests You Can't Afford to Skip
Beyond lubrication, there are two safety tests that are absolutely critical for protecting people and property. Make it a point to perform these checks every six months.
1. The Reversal Test
Lay a 2×4 board flat on the ground right in the door's path. Now, close the door. When it touches the board, it should immediately stop and reverse. If it continues to push down, the opener's force setting is dangerously high and needs professional adjustment. This test ensures the door won't crush something—or someone—in its way.
2. The Photo Eye Test
With the door fully open, hit the close button. As it’s coming down, wave an object like a broom handle in front of one of the safety sensors located near the bottom of the tracks. The door should instantly reverse and return to the open position. This quick check confirms your primary safety system is functioning correctly.
These tests take less than a minute but are crucial. If your door fails either one, stop using it immediately and schedule a professional garage door repair. For business owners, our commercial door services team can help establish a maintenance routine to keep your operations on track. You can also explore our online resources for more upkeep strategies.
Answering Your Top Overhead Door Questions
When your overhead door suddenly stops working, you don't just have an inconvenience—you have questions. As part of our comprehensive troubleshooting guide, we've gathered the most frequent questions we get from property owners across Texas and Oklahoma. Let's clear up the confusion with straight answers from the field.
Why Does My Overhead Door Go Back Up After I Try to Close It?
This is easily one of the most common service calls we get. The door starts to close, gets partway down, and then abruptly reverses. It’s frustrating, but it’s usually the door's safety system working exactly as designed—it just thinks something is in the way.
Nine times out of ten, the problem lies with the photo eye sensors. These are the two small "eyes" near the bottom of your door tracks. The first thing I always check is their alignment. Look for the small LED lights on each one; a steady light is good, but a blinking one means they can't see each other. Sometimes it's as simple as something bumping into one of them. Other times, especially in a shop or dusty garage, the lenses just need a quick wipe with a soft cloth.
If the sensors look good, the issue might be the "close force" setting on the opener itself. Your opener is programmed to reverse if it feels too much resistance, and sometimes that setting is just a bit too sensitive. If cleaning and aligning the sensors doesn't do the trick, check your owner's manual for instructions on how to adjust this setting.
What Was That Incredibly Loud Bang I Heard from My Garage?
There’s no mistaking that sound. A sudden, sharp "BANG!" that echoes through the building is almost always the sound of a broken torsion spring. These springs are mounted above your door and are under an incredible amount of tension, as they're responsible for counterbalancing hundreds of pounds of door weight.
When a spring finally gives out, it unwinds violently, releasing all that stored energy in a split second. That's the loud noise you heard. If you look up at the spring, you'll probably see a distinct 2-inch gap in the coil where it snapped.
This is not a minor issue; it's a critical failure. Do not try to open the door, either with the remote or by hand. The opener isn't strong enough to lift the door's dead weight, and trying to lift it manually is incredibly dangerous. This is a job that absolutely requires a professional with the right tools and training.
Can I Safely Fix My Own Overhead Door?
That really depends on what's broken. Some minor upkeep is perfectly fine for a property owner to handle and can save you a service call. You can definitely tackle things like:
- Changing the batteries in your remotes.
- Wiping off the photo eye sensors and making sure they're aligned.
- Lubricating the moving parts like hinges and rollers (just be sure to use a garage-door-specific silicone lubricant, not something like WD-40).
However, anything involving the springs or the lifting cables is strictly off-limits for DIY repair. These parts are under extreme tension, and a mistake can lead to serious injury. The same goes for any complex electrical work inside the motor unit. Our guide is here to help you confidently handle the small stuff and, just as importantly, to know when it's time to call in a pro. For more tips, feel free to browse our online troubleshooting resources.
How Often Does My Commercial Overhead Door Need to Be Serviced?
Commercial doors are in a different league. They're bigger, heavier, and get used far more than a residential door, so they need regular professional attention to stay safe and reliable. For a typical commercial door here in Texas or Oklahoma, we recommend a full professional inspection and tune-up at least once per year.
But if your door is in a high-traffic environment—think of a loading dock, a parking garage, or an apartment complex—you should bump that up to twice-yearly or even quarterly service. This proactive maintenance is key to preventing unexpected downtime, reducing liability, and ensuring your doors continue to meet crucial safety standards like UL 325 and OSHA regulations. Catching a worn-out part early is always cheaper than dealing with a catastrophic failure down the road.
When you've tried the basics and the door still won't cooperate, or you're facing a serious mechanical issue like a broken spring, it's time to call for backup. The expert team at Overhead Door Co. of Tex-Oma is always ready to provide safe, reliable service for your home or business. Contact us today for all your overhead door needs.
