That small gap under your garage door might seem insignificant, but a failing bottom seal is an expensive problem in waiting. Treating a garage door bottom seal replacement as a minor repair is a mistake—it’s a critical investment in protecting your property from escalating energy bills, water damage, and pest infestations.
Let’s analyze the data-driven costs of deferring this essential maintenance for your Texas or Oklahoma property.
The Real-World Costs of a Neglected Seal
When a garage door seal is cracked, flattened, or worn, it creates consequences that ripple far beyond the cost of a new rubber strip. For homeowners and commercial facilities in Texas and Oklahoma, that gap is an open invitation for problems that can escalate a simple maintenance task into a major financial liability. The growing awareness of these risks is a key driver in the expanding market for garage door components.

Skyrocketing Energy Bills
Your garage is an integral part of your building’s thermal envelope, acting as a buffer against a blistering Texas summer or an Oklahoma cold snap. A compromised seal allows unconditioned air to infiltrate the space, forcing your HVAC system into overtime. This isn’t a minor inefficiency; it translates directly into quantifiable spikes on your monthly energy statements. For a business with a climate-controlled warehouse or workshop, this energy waste is a direct hit to operational overhead, an issue we frequently address during our commercial garage door repair services.
Costly Water and Debris Damage
That gap is a direct conduit for rainwater and debris. A single intense thunderstorm, common in our region, can force water under the door, leading to damaged inventory, rusted equipment, and the ideal conditions for mold growth (Stachybotrys chartarum). Similarly, a West Texas dust storm can deposit abrasive particulate matter on vehicles, machinery, and stored goods. A high-quality bottom seal is engineered to create a barrier against these intrusions.
A worn-out seal compromises the integrity of the building envelope, turning your garage from a secure, controlled environment into an area susceptible to weather, pests, and energy loss. This directly impacts both property value and operational costs.
Unwanted Pests and Infestations
A significant hidden cost is the ingress of pests. Rodents can squeeze through an opening as small as a dime, making a failing seal a primary entry point. Replacing a worn seal is a fundamental step in integrated pest management, as noted in guidelines for how to prevent rats in your home by sealing entry points. For commercial facilities, particularly in food service or storage, a pest breach can lead to failed health inspections and significant financial penalties. The demand for durable, pest-proof components like bottom seals has pushed the global market for garage door replacement parts to a valuation exceeding USD 3.7 billion in 2023.
To quantify the difference, here’s a comparative analysis:
Impact Analysis: Worn Seal vs. New Seal
| Impact Area | Worn or Damaged Seal | New, Properly Installed Seal |
|---|---|---|
| Energy Efficiency | Air leaks cause higher heating/cooling bills, reducing building efficiency. | Creates a tight barrier, stabilizing garage temperature and lowering energy costs by up to 15%. |
| Water Protection | Allows rainwater to seep in, risking water damage, concrete spalling, and mold. | Blocks rain, snow, and runoff, keeping the garage floor dry and preserving structural integrity. |
| Pest Control | Provides an easy entry point for rodents, insects, and other pests. | Seals the gap, denying pests a common ingress route into the building. |
| Debris & Dust | Lets in dirt, leaves, and dust, increasing cleaning labor and potentially damaging sensitive equipment. | Keeps the garage cleaner by blocking outside debris from blowing in. |
Ultimately, a new seal is not just a part—it’s a strategic asset. It actively protects your property, reduces operational costs, and maintains a clean, secure environment.
Choosing the Right Replacement Seal
Selecting the wrong garage door bottom seal is a common and costly DIY error. To execute a garage door bottom seal replacement correctly the first time, you must match the seal’s profile and material composition to your specific door and the demanding climate of Texas and Oklahoma.
This is a technical decision, not just an aesthetic one. The right seal creates a robust barrier; the wrong one will leave gaps or fail to seat properly in the door’s retainer track. Let’s detail the selection process.
Decoding Seal Profiles
First, you must identify the seal “profile”—the cross-sectional shape of the ends that slide into the aluminum retainer on the bottom of the door. Matching this profile is non-negotiable.
- T-End Seals: The industry standard for most residential and many commercial doors. The T-shaped ends slide into a single channel on the retainer. They are manufactured in two primary sizes: 1/4-inch and 5/16-inch. Accurate measurement is critical.
- Bead Seals: Designed for retainers with two parallel C-shaped channels. The seal features a small, round bead along each edge that snaps securely into these tracks, creating a very tight fit often used in commercial applications.
- P-End & J-Type Seals: These profiles create a “P” or “J” shape when installed. They are engineered to form a more aggressive barrier against driving rain and are an excellent choice for applications where the driveway slopes toward the garage.
Actionable Tip: To eliminate guesswork, use a utility knife to cut a one-inch sample of the old seal. This sample allows you to physically match the profile and accurately measure the T-end or bead diameter at the hardware store or parts supplier.
Selecting the Right Material for Our Climate
In a region with extreme temperature fluctuations, material science matters. A standard vinyl seal can become brittle and crack under the high UV exposure and thermal cycling common in our area.
For most applications, a high-quality EPDM (ethylene propylene diene monomer) rubber seal offers superior performance over standard vinyl. EPDM rubber maintains flexibility in both high heat and sub-freezing temperatures, ensuring a consistent seal against uneven concrete surfaces year-round. For commercial garages or workshops where chemical exposure is a concern, consider a Nitrile (Buna-N) rubber seal, which offers excellent resistance to oils, greases, and solvents.
Measuring for a Perfect Fit
With the profile and material determined, the final step is precise measurement.
- Measure the Door’s Width: Use a tape measure to get the exact width of the garage door.
- Add a Service Margin: Always purchase a seal that is at least one foot longer than the door’s width. This provides a service margin, allowing you to trim it for a perfect fit without risking coming up short.
- Confirm the Retainer Size: This is the most critical measurement. Using your sample piece, measure the width of the T-end or bead. A 1/4-inch seal will not secure in a 5/16-inch track, and attempting to force a 5/16-inch seal into a 1/4-inch track will fail.
Following these steps ensures you procure the correct component. If this process highlights other potential issues with your system, learning more about professional garage door parts and service can provide valuable context on how all components integrate for optimal performance.
Setting the Stage for a Perfect Seal Installation
Proper preparation is the determining factor between a successful garage door bottom seal replacement and a frustrating project failure. Before installing the new seal, executing several key steps will prevent complications and ensure a durable, weatherproof result. This is about establishing a proper foundation for a lasting repair.

Safety is the first priority. Disconnect power to the garage door opener by unplugging it from the outlet. This eliminates the risk of accidental activation. Manually lift the door to a comfortable working height, then secure it by clamping a C-clamp or locking pliers tightly onto each vertical track just below the bottom roller.
This safety protocol is non-negotiable. The U.S. Consumer Product Safety Commission (CPSC) has documented severe injuries from unexpected garage door activation. Physically locking the door provides a mechanical failsafe, ensuring it cannot move while you are working.
Prepare the Retainer Track
With the door secured, focus on the aluminum retainer track. After years of exposure to Texas dust and Oklahoma ice, this track is invariably filled with dirt, corroded metal, and fragments of the old seal. Attempting to install a new seal into a fouled track is a primary cause of installation failure.
Use a flathead screwdriver to methodically scrape out caked-on debris. Follow up with a stiff-bristled brush to remove any remaining particulate. For optimal results, wipe the inside of the channels with a rag dampened with a degreaser or mineral spirits to remove any residual grime or oils that could impede the new seal.
Conduct a Retainer Inspection
While cleaning, perform a detailed inspection of the aluminum retainer itself. Look for any damage that could compromise the new seal’s integrity.
- Deformations: Bends or dents will pinch the new seal, creating both an installation obstacle and a future failure point.
- Corrosion or Cracks: Aluminum can corrode and become brittle, especially with exposure to road salt or agricultural chemicals.
- Loose Fasteners: Check that all screws securing the retainer to the door are tight.
If you identify significant damage, the correct course of action is to replace the retainer along with the seal. Installing a new seal on a damaged track is a temporary fix at best. Addressing this now prevents having to repeat the entire job prematurely. If you need a replacement retainer or encounter other issues, our team is equipped to handle any residential garage door repair. A clean, straight track is the foundation of a perfect seal.
Installing Your New Garage Door Bottom Seal
With preparation complete, it’s time to execute the installation. This stage requires methodical technique and patience to achieve a professional, weatherproof fit that will perform for years.
First, remove the old seal. It is often brittle and fused into the track. Instead of pulling from the middle, which can bend the aluminum retainer, use pliers to grip one end and pull it out of the channel. Once a few inches are free, you can typically slide the rest out by walking it down the length of the door.
This image illustrates the core process in three actionable stages.
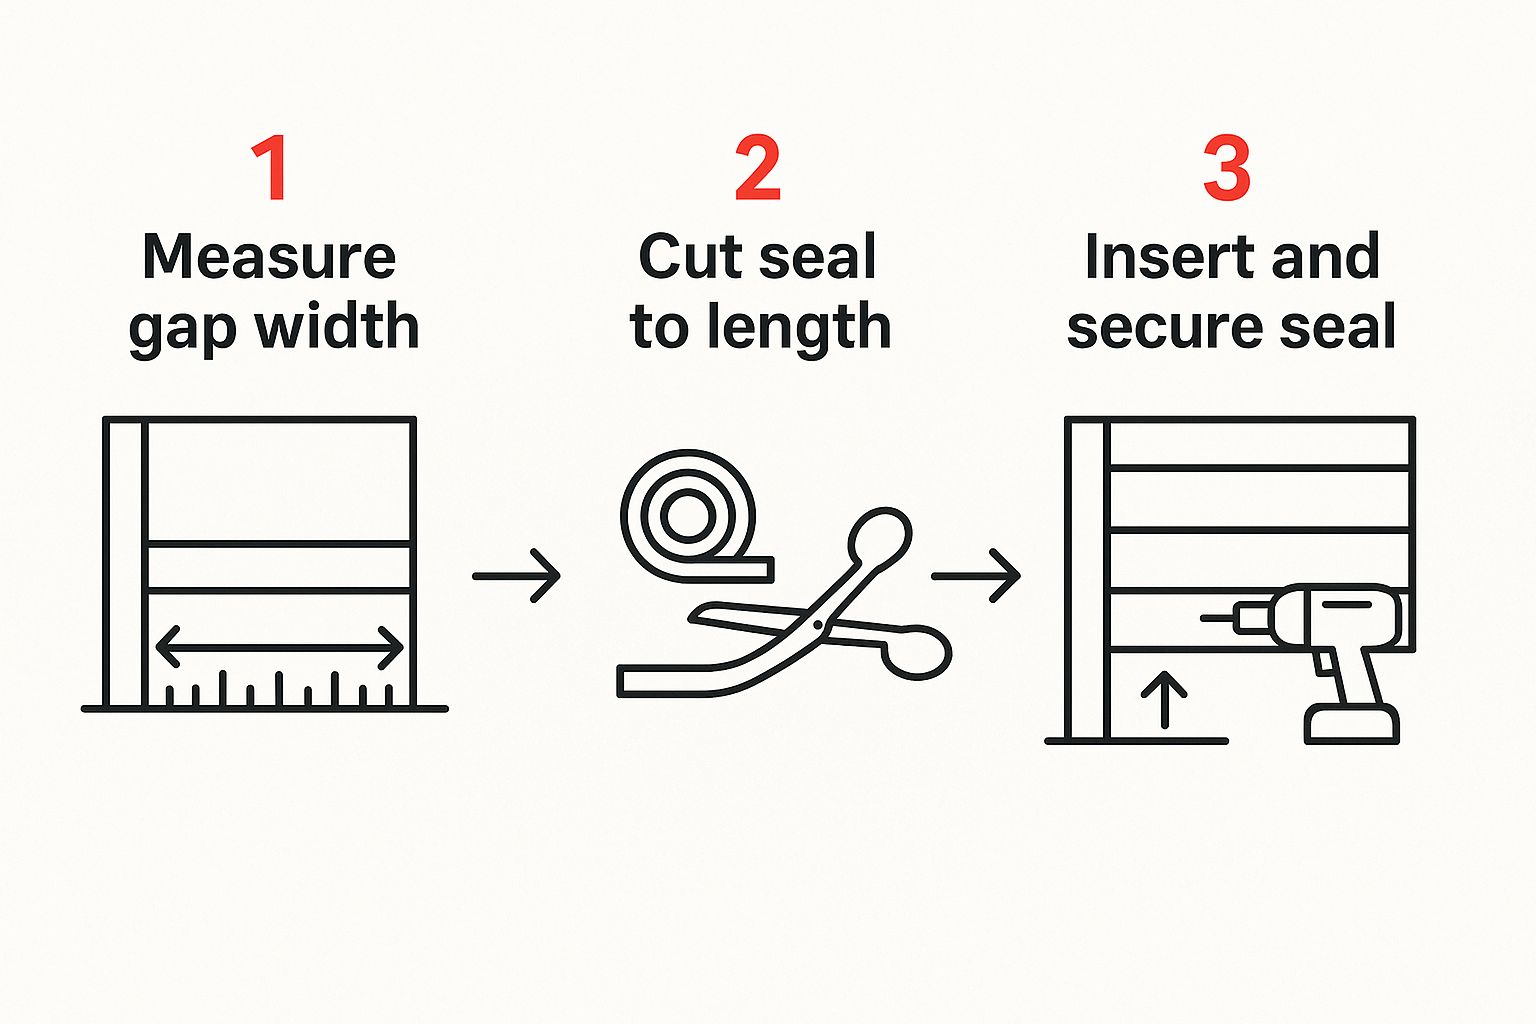
The process is straightforward: measure, cut, and install.
The Feed-and-Pull Method
Attempting this installation solo is inefficient. The industry-standard technique is the two-person “feed-and-pull” method. One person feeds the T-shaped edges of the seal into the retainer grooves at one end of the door. The second person, at the opposite end, gently and steadily pulls the seal through the track.
This coordinated approach is critical. Pushing the entire length of the seal from one side creates immense friction that works against you. Pulling it through minimizes this resistance, resulting in a smoother, faster installation.
Actionable Tip: Use the Texas or Oklahoma sun to your advantage. Lay the new seal out on a clean, flat surface for approximately 30 minutes prior to installation. The solar heat will increase the material’s pliability, making it significantly easier to feed into the retainer track.
Overcoming Friction and Snags
Even with a two-person team, friction can be a factor. The solution is lubrication. A simple mixture of a few drops of dish soap in a spray bottle of water is highly effective. Lightly spray the inside of the retainer channels and the T-ends of the new seal.
The surfactant in the soap acts as a lubricant, allowing the seal to glide through the track with minimal effort. If you encounter a snag, stop pulling immediately. The person feeding the seal can use a flathead screwdriver to carefully guide the T-ends past the obstruction.
If the task proves too difficult or you’re concerned about damaging the door or retainer, it is always best to consult a professional. Our technicians have specialized tools and have performed this task hundreds of times, ensuring any garage door bottom seal replacement is completed efficiently and correctly.
Cutting and Securing the New Seal
Once the seal is pulled completely through, leave approximately two inches of excess material on each end. Ensure the seal is not stretched taut before making the final cut with a sharp utility knife. The material can contract slightly over time, and this extra length prevents it from pulling away from the edges.
To secure the seal and prevent it from sliding horizontally in the track, you have two professional options. You can use pliers to crimp the ends of the aluminum retainer channels, or you can drive a small self-tapping screw through the retainer and into the seal on both ends. This final step locks the seal in place permanently.
Proper maintenance and quality components are driving significant growth in the garage door parts market, which was valued at USD 1.5 billion in 2024. You can explore more data on the garage door accessories market.
This small investment of time not only protects against drafts and pests but also enhances your property’s energy efficiency.
Final Checks and Long-Term Maintenance
With the new seal installed, a few final verification checks will ensure a perfect fit and establish a maintenance routine to maximize its service life. This final phase distinguishes a standard DIY job from a professional-grade installation, guaranteeing your Texas or Oklahoma property remains protected.
The most effective method for verifying the seal is the “light test.” Close the garage door completely and turn off all interior lights. Carefully inspect the bottom edge from inside the garage. Any visible daylight indicates a gap in the seal.
Ensuring a Perfect Seal
Minor light gaps can often be resolved by adjusting the seal within its track before crimping the ends. If the gap is caused by an uneven concrete floor—a common issue—you may need a seal with a larger diameter or more compressible material to accommodate the contours of the floor.
Once you have confirmed a light-tight seal, the focus shifts to preventative maintenance. The intense UV radiation and extreme temperature swings in our region are the primary causes of material degradation in rubber and vinyl components.
Proactive maintenance extends the life of the seal and ensures its continued performance. A clean, pliable seal is essential for preventing water intrusion, pest entry, and energy loss, which in turn prevents more costly problems and reduces utility expenses.
The demand for durable weatherstripping is a major industry driver. The global market for garage door weatherstripping was valued at an estimated USD 335 million in 2025. North America represents a significant portion of this market, driven by high energy costs and stringent building codes. With nearly two-thirds of American homes having a garage, the demand for quality seals is clear. You can explore more data on the garage door weatherstrip market and its trends.
Simple Maintenance for Longevity
To maximize the service life of your new seal, implement this simple maintenance schedule, applicable to both residential and commercial properties.
Here’s a practical, actionable routine:
- Clean It Regularly: Twice a year, clean the seal with a mild detergent and water solution to remove dirt, road salt, and chemical residues that accelerate material breakdown.
- Apply a Protectant: After cleaning, apply a water-based rubber or vinyl protectant with UV inhibitors. This acts like sunscreen for the seal, preventing solar radiation from causing it to become brittle and crack.
- Inspect Annually: Once a year, perform a visual and tactile inspection. Look for any tears, compressed or flattened spots, or signs of hardening. Early detection of wear allows for timely replacement before a failure occurs.
These small steps transform a simple repair into a long-term asset protection strategy. For other upgrades, we offer a range of durable garage door accessories designed to enhance performance and longevity.
Common Questions About Bottom Seal Replacement
Even a well-defined project like a garage door bottom seal replacement can present questions. Addressing these common queries with factual information is key to a successful outcome. Based on our experience serving homeowners and businesses across Texas and Oklahoma, these are the most frequent technical questions we encounter.
How Do I Know What Size Garage Door Bottom Seal I Need?
Determining the correct size is a two-step process. First, measure the full width of the garage door and purchase a seal that is approximately one foot longer to provide a margin for trimming.
The most critical measurement is the T-end profile size. The industry standards are 1/4-inch and 5/16-inch. These dimensions are not interchangeable. The only definitive way to determine your required size is to cut a small sample of the old seal and measure the width of the “T” portion with a ruler or caliper. Procuring the correct profile size is essential for a secure, weather-tight fit.
Can I Replace the Seal if the Retainer Track Is Damaged?
It is strongly advised against. Installing a new seal into a retainer track that is bent, cracked, or corroded is a fundamentally flawed repair. A damaged track will make it difficult, if not impossible, to install the new seal without damaging it.
Furthermore, even if the seal can be forced into a damaged retainer, it will not seat correctly, creating gaps that defeat the entire purpose of the replacement.
Best Practice: If the retainer shows any significant damage, it should be replaced concurrently with the seal. This ensures the new component can function as designed and transforms a temporary patch into a durable, long-term solution.
A damaged retainer is a critical failure point. You can learn more about identifying such issues in our guide on preventing garage door failures.
My New Seal Is Stiff and Hard to Install—What Should I Do?
This is the most common installation challenge, especially with new seals that have been coiled for shipping or in cooler ambient temperatures. The material’s rigidity can make it difficult to work with.
Here are three actionable techniques to mitigate this issue:
- Thermal Conditioning: Unroll the new seal and allow it to rest in direct sunlight for at least 30 minutes. The solar warmth will increase the material’s elasticity, making it more pliable.
- Use a Lubricant: A solution of water and dish soap in a spray bottle is an effective, non-damaging lubricant. Lightly mist the inside of the retainer tracks and the T-ends of the seal to dramatically reduce friction during installation.
- Employ a Two-Person Team: The “feed-and-pull” method is the professional standard. One person feeds the seal into the track while the other gently pulls from the opposite end. This technique is faster and prevents the seal from bunching or kinking inside the track.
Whether you are a seasoned facility manager or a homeowner tackling a DIY project, having a reliable partner is crucial. For expert technical advice, professional-grade parts, and expert service in Texas and Oklahoma, contact Overhead Door Co. of Tex-Oma today.
