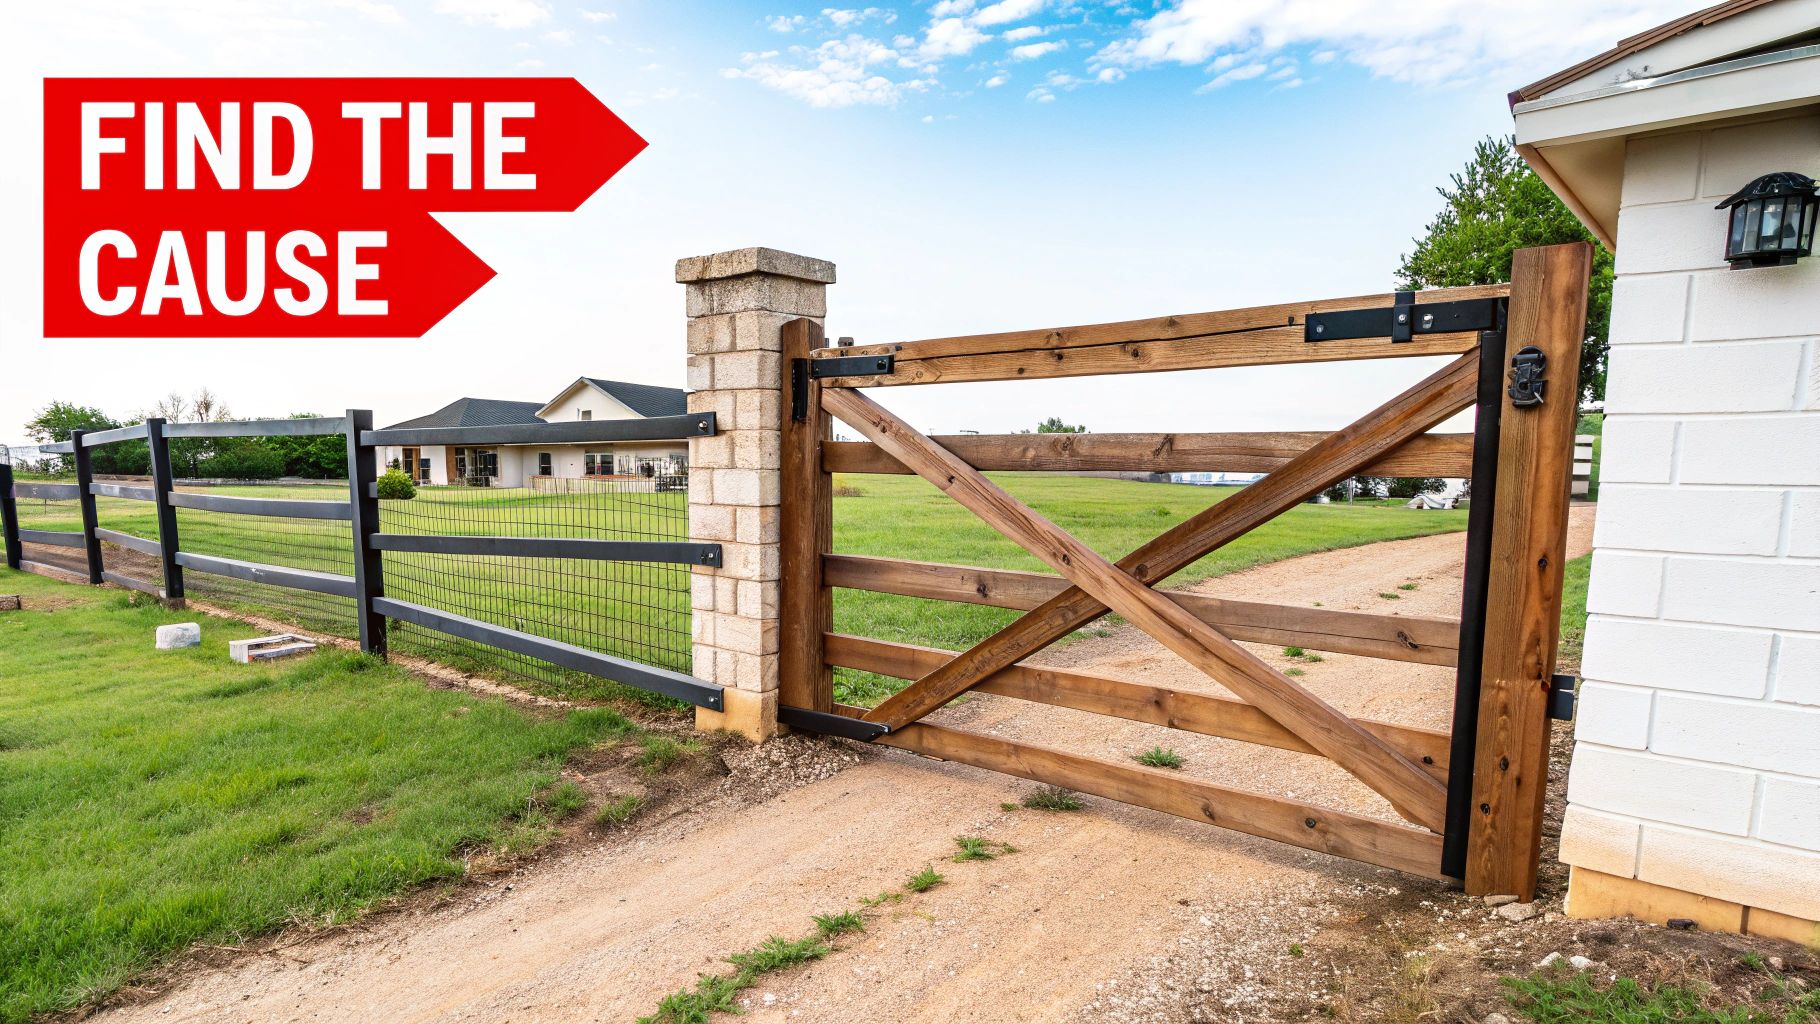
Before you can fix a sagging gate, you need to play detective. A gate that drags on the ground is just a symptom; the real problem is almost always hidden in its structure. While common DIY solutions like tightening hardware or adding an anti-sag kit can be effective, they only work if you've correctly identified the root cause of the droop in the first place. This guide provides actionable, real-world steps for homeowners and businesses across Texas and Oklahoma to achieve a lasting repair.
Diagnosing Why Your Gate Is Sagging
Here in Texas and Oklahoma, our expansive clay soils are a frequent troublemaker, causing posts to shift and settle over time. But whether it's the soil, old hardware, or the gate itself, a thorough diagnosis is the only way to avoid a temporary patch-up that will just fail again. It's all about finding the "why" behind the sag so your repair actually lasts.
The Usual Suspects: Posts, Hardware, and the Gate Frame
More often than not, the problem comes down to one of three things: the post is leaning, the hinges are worn, or the gate's frame is failing. Let’s break down how to check each one.
-
The Post: Think of the post as the foundation. If it leans, the gate leans with it. Grab a level and check if the post is plumb (perfectly vertical). Give it a good push and pull—if it wobbles, you likely have an issue underground, such as a shallow or cracked concrete footing. In our region, improper footing depth is a primary cause of post failure.
-
The Hardware: The hinges carry the entire weight of the gate. Over time, screws can work themselves loose from the wood, or the hinge pins themselves wear down. According to industry data, hardware failure accounts for over 40% of residential gate issues, often due to undersized hinges or corrosion. This creates slack and allows the far end of the gate to droop.
-
The Gate Frame: Sometimes the gate itself is the problem. Poor construction is a surprisingly common issue. Gates built with simple butt joints are significantly more likely to sag than those with more robust mortise and tenon or half-lap construction. Over time, these weaker joints lose their rigidity, causing the frame to rack out of square.
A sagging gate isn’t just an eyesore. For commercial properties, it can be a liability issue and may violate local building codes if it impedes a required exit path. It compromises your property's security by preventing latches from aligning and can lead to more expensive damage if ignored.
To help you get straight to the source of the problem, use this quick checklist.
Sagging Gate Diagnostic Checklist
Use this quick reference table to accurately identify the specific cause of your sagging gate before starting any repairs.
| Symptom | Potential Cause | How to Check |
|---|---|---|
| Entire gate leans with the post. | Leaning or unstable post. | Place a level on the hinge-side post. Push on the post to check for wobble. |
| Gate moves up and down at the hinge. | Worn hinges or loose screws. | Lift the latch end of the gate. Watch for movement or play in the hinges. |
| Gate frame is out of square. | Weak joints or frame failure. | Measure diagonally from corner to corner. The two measurements should be equal. |
By working through these symptoms, you can confidently pinpoint the issue and move on to the right repair.
Occasionally, the real culprit is ground stability. If you suspect shifting soil, addressing yard drainage issues can prevent future problems at their source. For a professional diagnosis or an installation built to handle our local conditions from day one, take a look at our comprehensive gate services.
Getting Your Tools and Materials in Order
Nothing's more frustrating than getting halfway through a project only to realize you're missing a critical tool. Before you touch the gate, let's get your toolkit sorted out. A little prep work will save you significant time and headaches.
Of course, you'll need the basics like a good drill and a wrench set. But the real game-changer for this job is a simple car jack or a bottle jack. Trying to lift and hold a heavy gate while simultaneously tightening bolts is a recipe for strain and inaccurate alignment. The jack does the heavy lifting for you, safely and securely. You'll also want sturdy wood blocks or composite shims for propping the gate up and making micro-adjustments to the height.
Picking Hardware That Lasts
When it comes to replacement parts, do not compromise on quality. This is especially true here in Texas and Oklahoma, where high humidity and temperature swings can accelerate corrosion.
- Screws and Bolts: Use only hot-dip galvanized or stainless steel fasteners. They are built to resist rust, which means no ugly streaks down your gate and, more importantly, a connection that won't fail prematurely. Using the wrong fasteners can lead to galvanic corrosion, weakening the entire structure.
- Hinges: If you need new hinges, pay close attention to their weight rating. A hinge that isn't rated for your gate's weight and width is a guaranteed point of failure. Look for heavy-duty, ball-bearing hinges for larger gates to ensure smooth operation.
- Anti-Sag Kits: For wooden gates, a high-quality anti-sag kit with a turnbuckle is your best friend. It’s a simple, affordable, and incredibly effective way to reinforce the gate frame and maintain its squareness for years to come.
Having the right materials isn't just about convenience; it's a key factor in the durability of your repair. A $5 investment in corrosion-resistant fasteners today can prevent hundreds of dollars in damage and repeated repairs down the road.
How to Reinforce and Repair Gate Posts
We often blame the gate itself when it starts to sag, but industry data suggests that over 60% of chronic sagging issues originate with an unstable gate post. A post that leans, wobbles, or has started to rot simply can't provide the solid foundation your gate needs to hang true. This is especially common in the shifting soils we see across Texas and Oklahoma.
Fixing this foundational issue is the only way to get a long-lasting repair.
For minor instability, you can often reinforce the existing post. A reliable method is to dig out the soil around the base, use a level to get it perfectly plumb, and then pour fresh, high-strength concrete to create a larger, more stable footing. This fix alone can add years to your post's life.
Another effective technique for wooden posts is "sistering." This involves setting a new, shorter post in concrete right alongside the original one. Once the new post is set, you bolt the two together securely. This transfers the gate's load to the new support, strengthening the entire structure without the expense of a full replacement.
This infographic breaks down the essential first step: supporting the gate before you start working on the posts or hinges.
Properly lifting and propping the gate first is a non-negotiable safety step that is critical for achieving correct alignment during the repair.
When to Replace a Gate Post
Sometimes, a reinforcement just won't cut it. If you're dealing with significant rot, deep cracks, or a severe lean, it’s time for a full replacement. This is the only way to fix the sag for good. The process involves digging out the entire old post and its concrete footing, then setting a new one plumb and level before pouring new concrete.
A properly set post is the cornerstone of a functional gate. The industry standard is to bury at least one-third of the post's total length underground. For a typical 8-foot post, this means a footing depth of at least 32 inches to get below the frost line and provide stability against wind and soil movement.
Since your gate is part of a larger fence system, looking into general fence repair guidance can give you a better big-picture view of maintaining structural integrity.
If digging out old concrete and setting a new post feels out of your league, don't hesitate to call a professional. A solid foundation is everything. Investing in a professional gate installation ensures the post is sized correctly and set perfectly from day one, which is the best way to prevent sagging down the road.
For a Lasting Fix, Try an Anti-Sag Kit
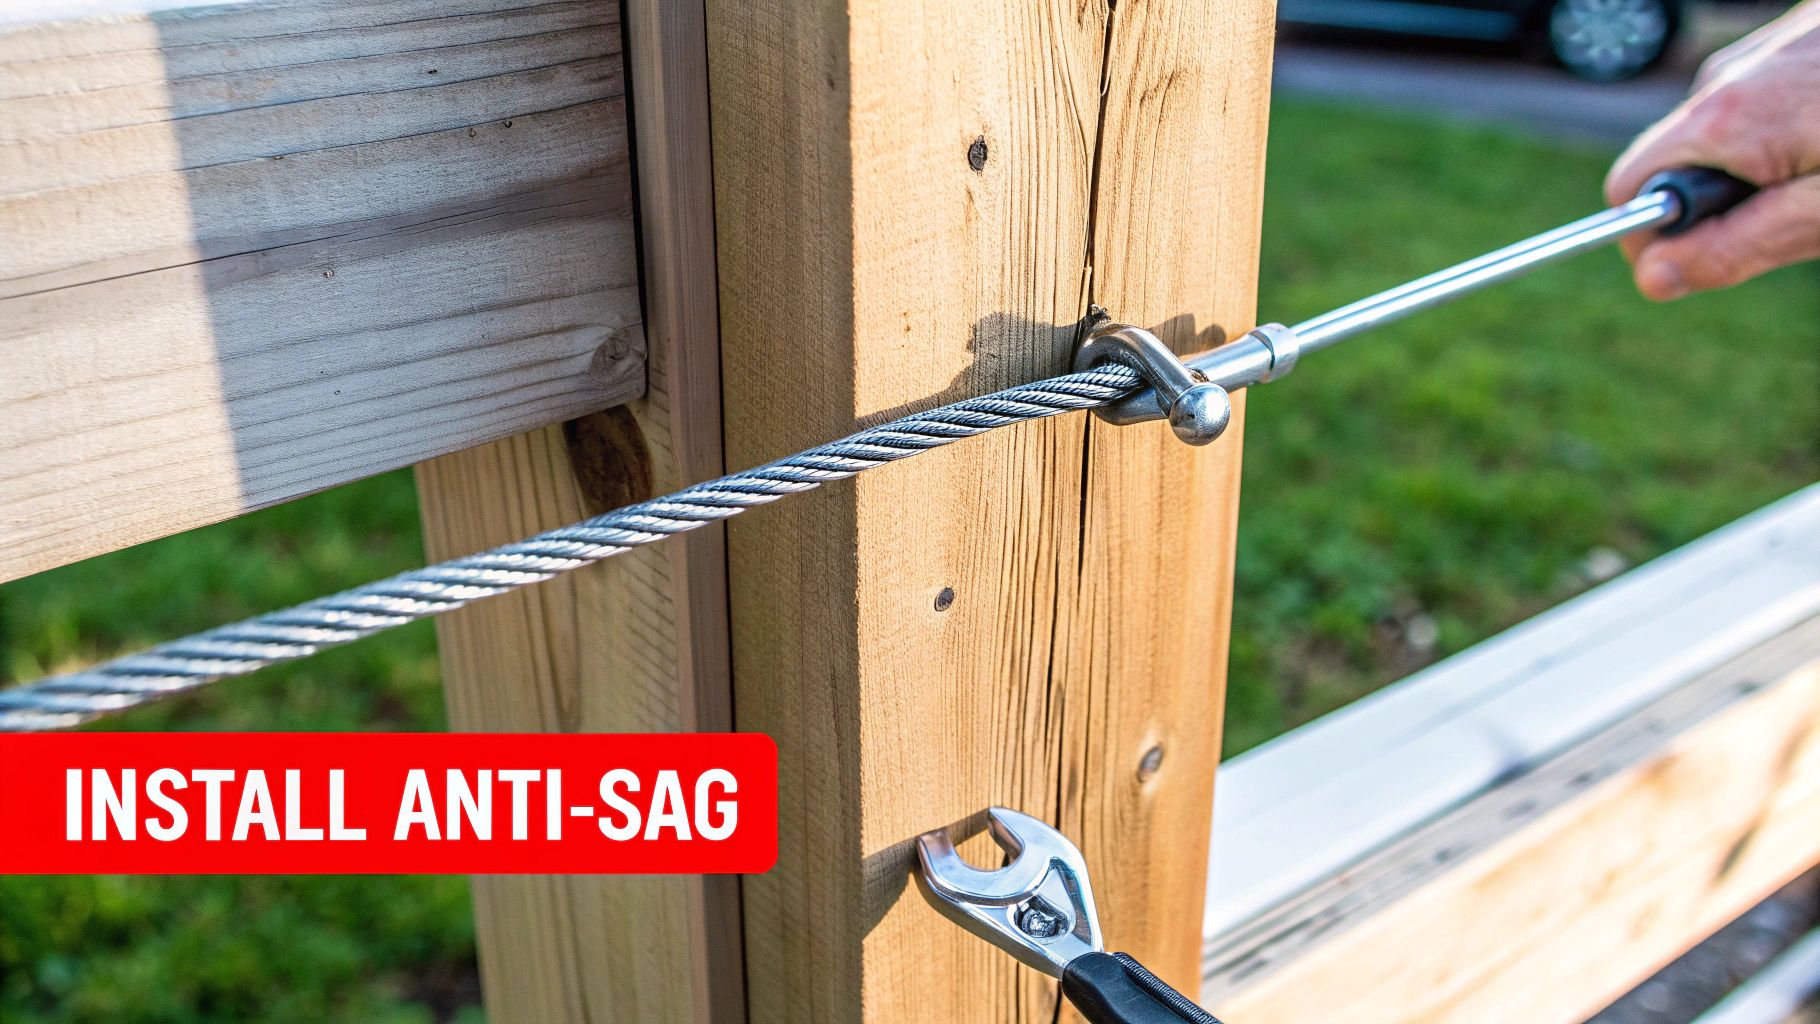
Sometimes, the gate posts are rock-solid, but the gate frame itself has started to lose its fight against gravity. The corner joints weaken over time, causing that familiar droop. Tightening hinge bolts might offer a temporary fix, but for a real, long-term solution, an anti-sag gate kit is your best bet.
These kits are a go-to for a reason—they work. The global market for gate hardware is projected to grow significantly, driven by effective, accessible solutions like these. For an average cost of just $20 to $50, an anti-sag kit provides a powerful, structural repair without a major expense, making it a favorite for both residential and commercial applications.
How Does It Work?
An anti-sag kit acts as a tensioning system. It consists of a steel cable, two corner brackets, and a turnbuckle, which work together to create a strong diagonal brace. This brace literally pulls the sagging corner of the gate upward, correcting the droop at its source. It's not a patch; it's a structural upgrade.
Here is the standard installation procedure:
- Attach one bracket to the top corner on the hinge side.
- Secure the second bracket to the bottom corner on the latch side.
- Run the steel cable between the two brackets, with the turnbuckle in the middle.
As you tighten the turnbuckle, you will see the sagging corner lift back into alignment. The key is to apply just enough tension to make the gate level and square. Be careful not to overtighten, as this can pull the gate frame out of square in the opposite direction.
This simple but effective device redistributes the gate’s weight, directing the load back toward the sturdy hinge post and taking the strain off the weaker corner joints.
Of course, if the hardware is too far gone or the gate has other structural issues, it might be time to call in a professional. Our expert gate repair services can diagnose the root cause and provide a permanent solution. But for most common sagging issues, a properly installed anti-sag kit can add years to your gate's life.
Proactive Gate Maintenance: Preventing Future Sagging
You've put in the work to get your gate swinging true again, so let's make sure it stays that way. Proactive maintenance is the key to preventing a gate from sagging in the first place, saving you significant time and money. It’s about shifting from a reactive fix to a proactive strategy.
Here in Texas and Oklahoma, our weather is tough on outdoor structures. The cycle of intense sun, heavy rain, and shifting soil means you have to stay vigilant. A few simple checks each season—lubricating hinges, tightening loose bolts, and inspecting posts—can catch small problems before they become big headaches.
Build a Seasonal Maintenance Routine
To keep your gate in peak condition, we recommend following this simple checklist twice a year, ideally in the spring and fall.
- Check Your Hardware: Inspect all screws and bolts on the hinges and latch. If anything is loose, tighten it down. Apply a quality lubricant like white lithium grease to the hinge pins to ensure smooth, low-friction movement.
- Inspect the Posts: Push firmly on your gate posts. They should feel solid. Look for any signs of leaning, rot, or cracking, especially after periods of heavy rain. Ensure water isn't pooling around the base, which can soften the ground and compromise the footing's stability.
- Test the Latch and Alignment: Your gate should latch smoothly without having to lift, push, or slam it. Misalignment is a clear sign that something is shifting, which puts constant strain on the entire structure.
For automated gates, professional tune-ups are even more critical. Industry studies show that gates receiving annual professional servicing are up to 67% less likely to experience failures related to sagging or mechanical issues. A recent analysis found that 55% of sagging incidents on automated gates were caused by preventable issues like worn hinges or improper lubrication—problems that routine inspections would easily identify. You can discover more about the financial benefits of professional gate care to see how it pays off.
A professional inspection is a smart investment. The average cost for annual maintenance is around $150, whereas a single emergency repair for a badly sagging gate can easily cost $450 or more, not including potential damage to the gate operator.
By making these checks part of your regular property maintenance, you’re doing more than just keeping your gate functional. You’re protecting your property’s security and value. Of course, if you'd rather leave it to the pros, our scheduled Gate Maintenance services are designed to give you complete peace of mind.
Common Questions We Hear About Gate Repair
When your gate starts to sag, you're not alone. We get calls all the time from property owners across Texas and Oklahoma with the same handful of questions. Getting the right answers can make all the difference between a quick fix and a call for professional help. Here's what we tell them.
How Do I Know if My Gate Is Too Heavy for Its Posts?
You can often see the signs before the sag becomes a major problem. Look at the hinge post—is it leaning inward, being pulled by the gate's weight? That's a classic red flag. Another telltale sign is the formation of stress cracks in the wood around the hinges, or the post itself feeling wobbly when you operate the gate.
As a rule of thumb, a standard 4×4 wood post is generally inadequate for gates wider than 4 feet, especially if they're made from heavy materials like solid wood or steel. For larger, heavier gates, you need 6×6 posts or steel posts set deep in concrete to provide the necessary structural support. If the hinges are pulling out of the wood, it's a sure bet the gate is winning the battle against its supports.
Is Fixing a Sagging Metal Gate the Same as a Wooden One?
The core principle is the same—restore level and square—but the repair methods are completely different. For a wooden gate, an anti-sag kit with a turnbuckle is a fantastic, straightforward fix. This solution is not applicable to metal gates.
With metal gates, sagging is almost always caused by a structural failure. You're typically looking at a broken weld at a joint or a bent frame member. To fix this properly, welding is required.
You can still perform a basic inspection. Check the gate post and hinges just as you would on a wood gate. If the hinges are bolted on, you can sometimes use shims to tweak the alignment. However, if you're dealing with broken welds, calling a certified welder or a professional gate company is the safest and most reliable course of action.
Key Takeaway: If you identify broken welds or a post that's leaning severely in its concrete footing, the best first step is a professional assessment. Attempting to maneuver a heavy, unstable gate without proper equipment can be dangerous and often leads to more extensive, costly damage.
When Is It Time to Call a Pro Instead of Doing It Myself?
Sometimes, a DIY repair isn't the right call. It's time to bring in an expert if you find that the gate post is seriously rotted, broken, or leaning at a dramatic angle. Replacing a post, particularly one set in concrete, is physically demanding work that requires precision to ensure a long-lasting result.
The same goes for very large, heavy, or automated gates. The risk of personal injury or causing more damage is too high without the specialized equipment needed to safely lift and support the gate during the repair.
If you're facing any of these issues or just want an expert opinion, feel free to contact our team for assistance.
For expert gate repair and installation services you can trust, count on Overhead Door Co. of Tex-Oma. We have the experience to solve any gate issue, ensuring your property remains secure and accessible. https://ohdctexoma.com
